Monday, April 04, 2011

The Story of a Little Light Fixture

This is the story of a little light fixture that no one appreciated.  No one wanted to take it down to replace it because it lived in the ceiling of a vaulted foyer.  It was in a safe place.  Safe from Sarahs and spray paint and electrician people.  Mostly safe because Sarahs are afraid to unwire and rewire things and also because Sarahs don’t own twelve foot ladders.  The little light fixture was safe in the ceiling.  It was happy being brassy and having lots of shiny things to reflect light.  But Sarah was not happy.  Brass equals bad, and blah!  Something had to be done about the little light.

brassy light

Enter Papa.  Owner of twelve foot ladders and possessing much electrical unwiring and rewiring knowledge.  This Papa came and took the little light fixture down from the ceiling and gave it to Sarah!  Oh Happy Day!  Sarah was joyful that she could scrub, wash and spray paint the little light fixture so it could have a new lease on life, and also so it would match all the other fixtures in the living room.

She took it apart into many little pieces.  The light fixture was sad, and afraid that Sarah would not be able to remember how to put all the pieces back together again.  Sarah was also afraid. :)

IMG_4940

Undeterred, Sarah spray painted all the pieces anyway.  The little light was unsure about this fancy oil rubbed bronze spray paint, but what could it do, it was all laid out in the garage in a bunch of pieces!  What would become of it?

IMG_4943

Luckily Sarah took lots of pictures of how the light went together and after careful internet research to fill in the blanks, she was able to put the all the little pieces back in the right places.  The little light fixture was kind of excited… it was clean and shiny and all its glass panes were polished and clear.  It was pristine!  Even the oil rubbed whatever wasn’t so bad, it was nice!  The little light fixture was happy again.  The Papa returned and reinstalled the light in the ceiling of the foyer.  The light shone brightly and looked around with new eyes… it was just perfect and matched all the other fixtures in the room!  It matched the lamps and the curtain rods, and the hardware on the furniture.  The little light rejoiced!  Sarah also rejoiced.

IMG_4979

People came and saw the little light and said how nice it looked.  It was appreciated, not only for its light, but for its beauty.  The little light and Sarah lived happily ever after.  The end.

IMG_8954    IMG_5011

Thursday, March 24, 2011

…Eat a Cupcake

See how this post was supposed to be about a new shelf I put in the kitchen… but it’s turning into a story about a cupcake?  Why does that always happen to me? ;)

I was Goodwill hopping the other day when I spied this cutey little shelf for $3.50!! Woot!  I’ve been looking for a nice shelf to hang over the kitchen table that I could decorate with plates and teapots and cute kitchen things.  This one, while a bit smaller than the one in my imagination, was a great price and in perfect condition!  When I got it home, I hung it on the wall behind the kitchen table… a sad and neglected little corner which is usually just a landing spot for purse, lunchbox, mail, cat toys, etc. :)  While it still functions as such, at least it has a bit more pizzazz after my little addition:

   IMG_4900

I moved the flower picture to the opposite wall to accommodate the new shelf.  And of course after I hung the shelf, I ran around looking for cute things to put on it.  The teapot was number one, since I’d been imagining it up there for a while, then I found a blue polka dot plate.  After that I had to get creative…  so I framed up a little quote.  It’s a take off those “Keep Calm and Carry On” posters you see everywhere.  But why “carry on” when you could just eat a cupcake?  Then the little kitty cat salt and pepper shakers joined the fun to round out the display.  This is mind-blowing stuff, I know. ;)

IMG_4857 

Just a little bit more cute for my kitchen. :)

Hope you enjoyed the update!  I’ll be back with more fun from the Horvath House, namely— A Fence For Riley, and Spring garden pics!

signature

Sunday, March 20, 2011

Welcome Spring!

Spring has sprung… finally!  Hope the warm weather and sunshine are reaching out and touching your neck of the woods, too!

Just wanted to share the first blooms of the season from our yard:

IMG_4865  

Happy Spring!

I’ll be back, hopefully soon, with a couple of cute updates in the kitchen! :) I’ll give you a hint… it involves cupcakes! ;) 

See you then…

signature

Thursday, March 10, 2011

Step by Step

I recently acquired this cute little stepstool.  (i.e. My father filched it for me from a friend who was cleaning out their garage.)  With hand carved hearts on each end.  Just my style… ;)  I decided it would be the perfect stepstool for my closet.  For when I’m trying to get something off the top shelf and I don’t feel like dragging my desk chair all the way down the hall.  :)

Here’s what it looked like before I got my hands on it.  Well actually I put my hands on it to put it on the table there.  And I put my hands on it when I sanded the “Home Sweet Home” off the top.  So, this is what it looked like after I got my hands on it, but before I got my paintbrush on it:

IMG_4636

Here’s what it looked like after I got some primer on it.  Just the bottom part.

IMG_4704

And here’s what it looked like after I got two coats of semi-gloss paint on the bottom, and one coat of stain and two coats of poly on the top:

IMG_4876

Cute! 

Doesn’t everything look fancy with some old books piled on top? 

Y’all know that’s what I’m using this stepstool for, right?  Display place for my very old books.

IMG_4891

Okay, for all you reality lovers out there, here’s where it actually lives.  At the back of my closet, ready to springboard me to the top shelf in my search for winter boots, fancy shoes, or handbags.  :)  Yay!

IMG_4894

If you need me, I’ll be in the closet, needlessly reorganizing my top shelf just so I can try out my cute new stepstool!

signature

Wednesday, March 02, 2011

Spring Spruce-up (Outdoors!)

Lately we’ve been having some beautiful weather with warmer Spring temps.  That’s perfect weather for yard work!  The last two weekends found me spreading pine needles in the front yard.  After living here for 2 1/2 years, we’ve finally gotten around to putting fresh pine needles on the huge flower bed in the front yard.  Shame.

First I had to rake all the old “mulch” off the soil.  “Mulch” being dried leaves, old pine needles, a bazillion acorns, gum balls, sticks and debris that had been left to pile up over the past 3 years.  Whew!  After I finally got it mostly cleared, we brought in fresh pine bales.  Here’s a look at the transformation:

IMG_4650 IMG_4652

IMG_4651

IMG_4653

Very nice and clean looking. Now I just have to get to work trimming all the liriope and we’ll be set.  Here’s what it looks like today with some of the daffodils up!

IMG_4752

IMG_4754

I had a few pine bales leftover so I spruced around the mailbox bed while I was at it.  This poor flower bed has been neglected.  It has never been mulched, until now!  We have plans in the future to expand and reshape it, but for now a little spruce was a welcome change:

IMG_4756

I’ve added a few more Spring touches to the front of the house, too—a new welcome mat to replace our worn out one, a matching wreath (that I whipped up using everything yellow I could find!) and some blue pansies!  I can’t wait for Spring!

IMG_4654

IMG_4656

IMG_4763    IMG_4767

How are you sprucing for Spring?

 image FreeSpringClipArt

signature 

Sunday, February 20, 2011

Mirror Frame Take Two

Last week, I told you how I framed out the mirror in the master bathroom.  Well, I neglected to tell you how the mirror was installed in four pieces, with tiny gaps between the mitered corners, and adhered using double stick tape that began popping off the frame the next day.  Cry.  After much deliberation and driving around to five different stores looking at various kinds of adhesive, I finally found something that I think is a permanent solution!  Here’s the story…

Blogland was buzzing with before and after framed mirror makeovers; I became awe-stricken that my mirror was, as yet, naked.  Frameless.  Sad.  I had to have me one of those mirror frames!  Finally, the time had come for us to redo our master bathroom, and at last, I would have a framed mirror!  After a little research, off I went with my trusty Papa in tow (and Papa’s truck, too!) to pick up some molding.  I think what we bought is technically chair rail, but it was the right size and shape and had a flat back that I could adhere over the mirror.  Sold! 

We measured our mirror, keeping in mind that the new frame had to cover the thin metal clips at the top (We replaced our giant plastic rosette clips with 1/4” offest metal mirror clips that were low profile, so the frame would sit flush on top of them.) and also cover the gold J-channel that was holding our mirror at the bottom (basically it sits on the top of the backsplash).  So I added about 1/2” to the mirror dimensions on all sides (a little overlaps makes it harder to see the edge of the mirror behind the frame.  Then we cut our pieces and mitered the corners.  I stained the pieces, front and back (mirrors reflect about 3/8” of the back of the frame) but left the mitered corner cuts free of stain so I could later glue the corner joints together. 

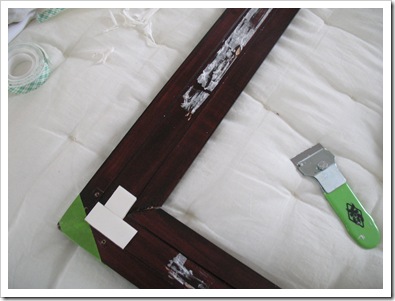
Here is where the story goes all wrong.  I used thick double stick tape (of the vintage variety) to stick each of the four sides to the mirror.  This is why I had those gaps in my corners.  So, after the thing fell off the mirror (lol), I decided to buy corner braces to secure the corner joints and glue them together properly.  Glue + braces + weights to hold it all together + 24 hour drying time = frame. 

IMG_4659

IMG_4634

Then came the next hurdle… to double stick tape (again) or not to double stick tape.  I was still stuck on the tape (pun intended) for its quick stick ability, but I thought I would use liquid nails all over as the adhesive.  Tape in the corners and glue everywhere else, that way it wouldn’t fall off while the glue was drying.  What do I know, I’ve never even used liquid nails??  Thus began my search for the elusive double stick tape of yore.  All I found was mounting tape which wouldn’t stick to my finished wood.  Boo!  Back to the drawing board.  In all my adhesive hunting, I stumbled upon a product I hadn’t used in a while: adhesive velcro!  This is a perfect solution because when stuck together the two pieces of hook and loop make a thick strip with adhesive on both sides (just like double stick tape!).  See that channel in the middle of my molding?  That’s what was keeping the double stick tape from sticking (even though I used two pieces stacked on top of each other for double thickness).  The tape wasn’t thick enough to bond the mirror properly from inside the recessed channel.  I couldn’t put the tape on the inside edge because the mirror would reflect it back, and I couldn’t put it on the outer edge because my mirror edge is beveled.  So, it had to go in the middle recessed channel.  But, lucky for me the velcro fit perfectly and made up the thickness that I needed to clear the channel.  Finally, I cleaned off the old tape and put on a lot more velcro strips than before.  Then I stuck it on the mirror!

IMG_4660

IMG_4661

::Cue the angels::

IMG_4613

Hallelujah, it worked!  It’s working! :)

And here is your secret glimpse at Mr. Adhesive Velcro.  This is what you see if you lay your face against the mirror and try to look behind the frame… a fuzzy white strip of Velcro.  Heaven help me if I find my guests in my master bathroom trying to look at my shoddy mirror frame adhesive.  You’ve been warned.

IMG_4663

That’s it, that’s my secret.   No messy liquid nails.  No more tape.  ADHESIVE VELCRO! Hooray!  So, that brings us to the end of the lesson.  Hopefully if any of you attempt a similar project you have an easier time of it.  :) 

All-in-all, however frustrating it was, the ends justify the means:

IMG_4525  IMG_4613

signature

Wednesday, February 16, 2011

Master Bath Reveal!

A couple weeks ago I started this master bathroom makeover and I am finally back to reveal the finished product!  You may remember our old vanity cabinet—Builder grade plywood with an oak stain; it was dirty, scuffed, and lackluster.  Nothing that a little sanding and a million five coats of stain can’t solve.  :)  I used the same technique as before with my favorite Bombay Mahogany Polyshade.  Polyshade is stain + polyurethane all in one.  It goes on like thin paint rather than stain, so you have a lot more risk of runs, drips, and brush marks.  I had my fair share that I had to sand out, but after five coats, they are not so noticeable.  As it dries, the brush marks settle out and give a nice smooth finish (hopefully!).  Even with a few mistakes, it still looks way better than before.  And for the price of stain and hardware, you can’t beat this DIY cabinet makeover!  Throw in a new matching mirror frame and a few accessories and voila!

IMG_4362 IMG_4629

Goodbye Blah… Hello Fabulous!

  IMG_4520

IMG_4612

It’s hard to tell in these photos, but there are highlights and lowlights in the finish.  It looks more like stained wood than painted wood in real life.  To finish off the new look, I added new brushed nickel knobs (eBay) and spray painted the old hinges and reused them.  I love the new look!  Especially the mirror frame!  It makes the mirror look huge, and reminds me of a fancy hotel.  :) 

For the frame, we bought simple molding, mitered the corners, stained it, and stuck it to the mirror.  Easy elegance.

IMG_4613

Now, the vanity coordinates with our oil rubbed bronze shelf, shower curtain rod, and framed art. 

IMG_4633

While I was at it with the polyshade, I slapped a couple coats on the butterfly frame so it has a fresh look, too.

IMG_4626

  Now that my second foray into staining cabinetry is at an end, I think I can safely say this bathroom is DONE! :)

(for now) ;)

It has come a long way from back in 2008 when we moved in.  Here’s your parting glance:

IMG_8204  IMG_4633

So, comments are open, I want to hear, What do YOU think?

signature