Wednesday, March 06, 2013

A Full Length Mirror

It’s one thing every girl needs… a full length mirror so she can check out how those shoes go with that outfit.  For the past four years, I’ve been running downstairs to the den where my full length mirror resides to check out my shoes.  I am a seamstress so it’s important to have a mirror downstairs for my clients.  But I’ve always wanted to get one for my bedroom, too. I wanted one of those giant, leaning monstrosities that costs upwards of $200, but I wanted it for fifty bucks.  Story of my life. :)

Well, my mother tipped me off to a mirror at Big Lots that was pretty large, not big enough to lean, but definitely surpassing the $20 over-the-door mirrors that you see in college dorms.  This one was only $50.  And after hemming and hawing over it and looking at comparable models at Overstock (nothing under $100) and Lowe’s (one I found for $90) I decided to get the Big Lots version.  Lucky for me, Sunday was 20% off everything in the store!  Woot!  So I picked up this bad boy for forty bucks and Mama and I wrangled it into my car with complete lack of finesse. :)  And yesterday I hung it up on the wall beside my closet (even more lack of finesse involved there… evil wall anchors!). 

Anyway, check it out!

IMG_2502

It has a plastic frame (I would have preferred wood), but for $40 what do you expect?  The frame is a dark brown color which looks black in pictures and if you are Michael.  (I told him it’s brown.)  The mirror is almost five feet tall and a foot and a half wide which sure beats those crappy over the door mirrors. 

IMG_2504

See how the dark brown coordinates with the dark brown frame on the same wall?  Both of those frames are a bit dark for the wood tones in this room, so I may end up painting the mirror frame at some point, but for now I am loving it!

IMG_2432

And most importantly, this mirror is big enough for me, or my 6 foot tall husband, to see ourselves in (even our shoes!).  Oh and Riley can see herself, too.  She likes to stand in front of it and look at the room backward.  She’s a funny girl. :)

IMG_2516

signature

Tuesday, February 12, 2013

Valentine Love Birds

I don’t usually decorate for Valentine’s Day… which is a shame because I have a pink obsession!  My hoarding of pink stuff could really be an advantage when February 14th rolls around.  While I decorate obsessively for Christmas and Halloween, most of the rest of the year I keep my decor the same… neutral/spring/summer flowers, butterflies and birds.  Well… this year I was inspired to create a little Valentine’s scene.  I saw a “classic romance” vignette at Less than Perfect Life of Bliss which was the jumping off point for my creation.

IMG_2450

I decorated the top of my flatware cabinet in the dining room, starting with a silver tray topped with photos of me and my Valentine.   I threw in a pink candle (Pink Sands by Yankee Candle—the BEST fragrance!) a tiny heart shaped trinket box, and a silver creamer filled with white roses and a single red rose from my hubby that I saved many years ago.  Then I used Scrabble tiles and spelled out a sweet Valentine’s sentiment (for thirteen points).  :)

IMG_2442

IMG_2444

IMG_2446

The corner cabinet across the room also got a little “Love Birds” vignette.  I created a trio of dimensional paper hearts using a printable from Hymns and Verses.  Two of them went into the little love nest and the other one I made into dimensional art with some scrapbook paper and a sticker that reads “Love is a beautiful dream.”  The tiny love letters are actually floating candles that my mom had.  She gave them to me for my cute Valentine’s displays. :)  Thanks Mama!

IMG_2437

I continued the love birds theme in the kitchen on my tiny shelf.  A second bird is guarding another love nest.  A tiny pink heart is nestled inside.  More love letters and a few pink and yellow flowers round out the display.

IMG_2454

So far I haven’t had any complaints about the abundance of pink stuff in the house, so perhaps I can keep these up until Spring.  :)  Nothing says Spring like birds and pink flowers!

valentines

signature

Sunday, February 10, 2013

Cloudcover Quilt

Happy February!  I finally found some time to photograph our new comforter that I ordered for Christmas.  After Riley destroyed our beautiful cream Pottery Barn essential quilt I had to replace it.  And since the PB one was sold out and discontinued ::wails of despair:: I had to find something else that I loved.  So I scoured the internet in search of something light and beautiful, made of cotton in cream or blue.  What I finally discovered was the Diamond Stitch Cloudcover Quilt from West Elm.  I was worried about ordering something blue because I had past experiences with the blues not matching my impression of them online.  Luckily this blue was the PERFECT shade to match our paint color (Going Gray by Olympic).  It was love at first sight!
IMG_2407
It is more like a comforter with tufted quilting and navy blue topstitching.  I wasn’t sure the topstitching would look right in our bedroom, but I think its just the right touch of contrast.
IMG_2414
IMG_2412
Yay new quilt!  Let’s just hope that “Riley the Ripper” doesn’t get ahold of this one and that it will last for a long time!  Maybe even long enough that I’ll iron it one day! :)
IMG_20130203_121034_113
signature

Tuesday, January 15, 2013

Closet Under the Stairs Makeover

I bet you didn’t know there is a closet under the stairs.  Maybe you’ve been to my house and you do know. :)  Maybe you guessed there was… maybe I’ve mentioned it?  Anyway there is!  It’s right across from my laundry room and adjacent to the garage and den, so it’s the perfect space for storage.

It’s fairly large as far as closets go, but it’s not big enough for Harry Potter.  And it’s cut into the staircase so the back wall angles up and hits you in the head about three feet into the closet.  I tried to make it work for a while with some cabinets and shelving that I already had.  I basically stuffed every piece of organizing furniture in there and filled them up with fabric and supplies and then shut the door on it!  Here’s what I am talking about:

IMG_2634

That’s a bad picture from 2010, but still you get the idea—it was a mess!  It has been through various stages of “makeover” and organization over the past few years.  At one point there was even a file cabinet in there!  But it wasn’t until we had to empty the closet to lay new flooring that I really decided what I needed to do with this space. 

We cleared it out and tore up the carpet.  Before the new floors went in I painted the walls a nice crisp white.  The trim and door also got a refresh.

IMG_0964

IMG_0965

Not much to look at yet.  So we added some shelving to the back of the closet to maximize storage space against that angled ceiling.  And I forgot to take a picture before I began stuffing things back in there again.  :(

Anyway, since then I have organized a bit more (not likely to last!) and cleaned up things for a reveal!  You can see the shelving design as well as the upper shelf over the hanging bar.  I use this closet now to store giftwrap, giftbags, boxes, yarn, silk flowers, polyfil and party supplies.  Since I got my cubby bookcase in the den, I have moved all the fabric out of here to those or to the filing cabinet in the garage. 

IMG_2373

The hanging bar is useful for storing all my pretty tablecloths so they don’t get super wrinkled.  The top shelf is the shallowest since the angle in the ceiling cuts off the back.  It’s perfect for relatively flat things, so I use it to organize gift bags and boxes.  Christmas and Non-Christmas are separated so it’s easy to find what I need.  The second shelf holds more Christmas boxes on the left and the two pink ones on the right are filled with bows, tissue and tags.  The third shelf has party supplies and yarn.  And the rest of the stuff is on the floor.  The laundry hamper in front holds all of my giftwrap.  I am kind of a giftwrap junkie so I have a lot and this is the perfect way to store it all neatly.

IMG_2369

IMG_2372

It is so nice to be able to get into the closet now and find what I need easily.  The three levels of storage I had before were just not working because I had to pull everything out to get to the things in the back.  This room has a lot of floor space left and that’s important because this is the space that Michael uses to brew beer when he does that.  It’s cool, dark and can be closed off from the pets, so I let him make it smell all yeasty in here sometimes. :)

Anyway that brings us to the end our quick little tour of the closet under the stairs. :) Hope you enjoyed seeing a secret nook in our house!

signature

Tuesday, January 08, 2013

New Couch Reveal!

I know you all have been sitting around with bated breath, waiting for the big reveal of our new couches… so without further adieu, I bring you the first of many updates of 2013!

I’m sure you remember me telling you that my mom was reupholstering our sad, tired couches as our Christmas gift this year.  Well right before Christmas they were delivered and I have been waiting to reveal the room until we got our new television hung on the wall.  That was accomplished last weekend (Thanks Mike and Nelson!) so here we are:

IMG_2295

The couches are covered in a warm beige colored chenille type fabric.  I don’t know the exact name (wish I did!!) because we bought it at a wholesale fabric outlet.  But it’s a lovely color and very comfy!  The only thing we changed when reupholstering these bad boys was the dust ruffle.  We just left it off and I like how simple and open it feels without it.  Mama refinished the legs of the couches to match all the rest of our furniture.  Bombay Mahogany for the win. :) 

IMG_2296

After I took down all of the Christmas décor, I had to decide how to redecorate the room around the new couches.  They are so plain in comparison to our old plaid couches that it was challenging to bring in some color and pattern without a big statement piece to go from.  I’m hoping to bring in more pattern and color with some new draperies.  I am still hunting for the right fabric for those.

IMG_2299

I basically stole all of this from the den, where all my beautiful accessories have been gathering dust and being neglected since we are hardly ever in that room.  I stole the blue and green striped pillows which I think look awesome backed up with the brown floral ones from before.  And the teal throw was originally for the guest room but it goes with all the blue accessories in here.  The metal butterfly art on the wall between the windows is also from the guest room.  After Christmas came down, that spot was looking bare so I threw that up there and realized how nicely the blues and greens played in this room.

IMG_2298

My antique trunk turned side table is sporting an ivory frame and a potted plant.  Here’s a close up of the couch detail and the pillows!

IMG_2300

I still needed some more teal accessories to wrap up the color scheme so I repainted a couple of thrift store frames that were in the office.  I think they look nice but Michael says they are ugly. haha! :)  They might get relegated to the den later on…

IMG_2302

The teal blue bird pillow is also stolen from the den (poor den is looking lonely) and it fits perfectly in my “butter chair”.  It’s called the butter chair because it is the color of sweet cream (or something related to butter) and it so soft it feels like butter… or you feel like butter sitting in it!  :)  And here is one gratuitous shot of the new TV mounted on the wall.  I had to move the gallery wall up to accommodate the height of the TV.  I am undecided what to do about the cords.  I haven’t had a chance to look at cord covers yet…  to be continued.

IMG_2297

I will leave you with this parting glance at the new space and a before and after comparison of the old and newly refurbished couches. 

IMG_0896

IMG_2295

Love love love our new couches! 

Hopefully it won’t be long before I’m back with a reveal of the new draperies.  Stay tuned…

signature

Wednesday, December 26, 2012

2012: Before & After

December is coming to a close and the New Year is just around the corner.  It’s time to reflect on last year’s accomplishments and plan next year’s home goals.  Here’s a look back at what I planned to work on this past year:

  • Paint the kitchen walls and trim and possibly the cabinets
  • Paint the hallway, living room and foyer
  • Build and install desk for office, refinish bookcase to match, install bifold doors on closet
  • Install laminate floors in den (I think it might be the year!)
  • Make curtains for den windows
  • Hang additional shelving in garage (and reveal after pics of it all!)
  • Rebuild deck…  (don’t hold your breath for this one)
  • Actually make plans to clear out “the last frontier” for sunny vegetable garden??
  • Finish exterior spruce-up with black shutters, black storm door, and freshly painted white trim!
  • Install paver patio/pathway between deck and garage

That’s more than 50% accomplished.  Granted the things we did were minor in comparison to some of those big projects on the list.  Like the… ahem… deck rebuild.  We did get lots of painting done, some new furniture installed and I finally got my laminate floors in the den!  Plus we spent the hottest part of the summer installing our paver patio.  But that is something we can check off the list! :)

Here’s a rundown of my most notable projects from 2012.

In January, we built and installed our custom dream desk which was the best Christmas present ever and maybe the best project we’ve ever done.  We use this desk every day and we love it so much!

IMG_8355

IMG_9363

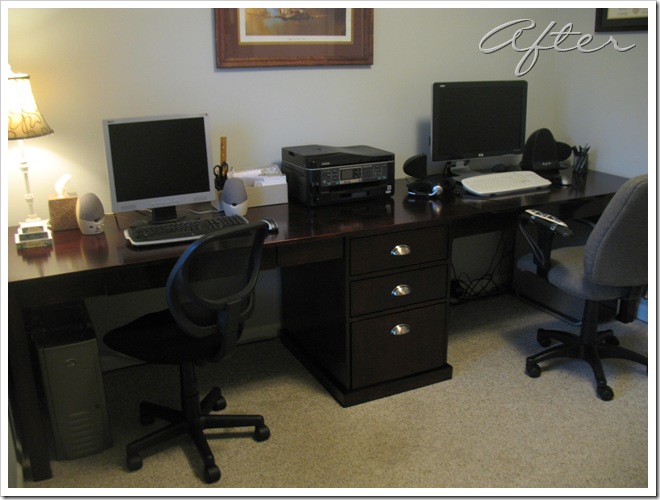
From pathetic to outstanding! Hooray!  I never refinished the bookcase or installed bifold doors.  I may put those projects on the back burner.

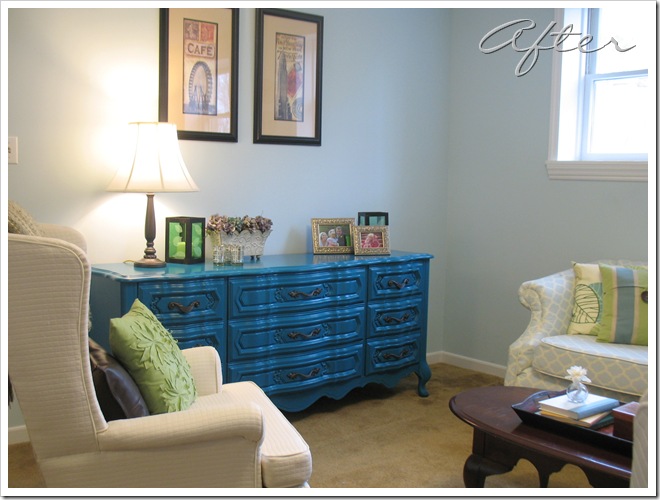
In other furniture upgrades last year, I refinished an old dresser in a vibrant shade of turquoise for the den.  I still haven’t organized those drawers as much as I would like, but I am happy to have a smaller piece of furniture in this space.  And that bright color doesn’t hurt either. :)

IMG_8601

IMG_9373

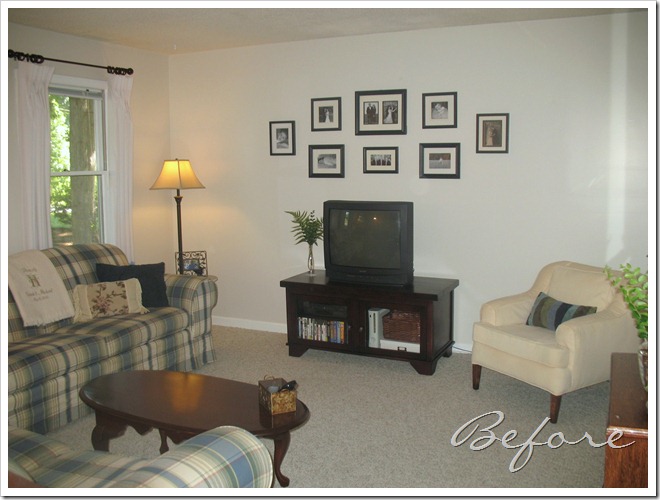
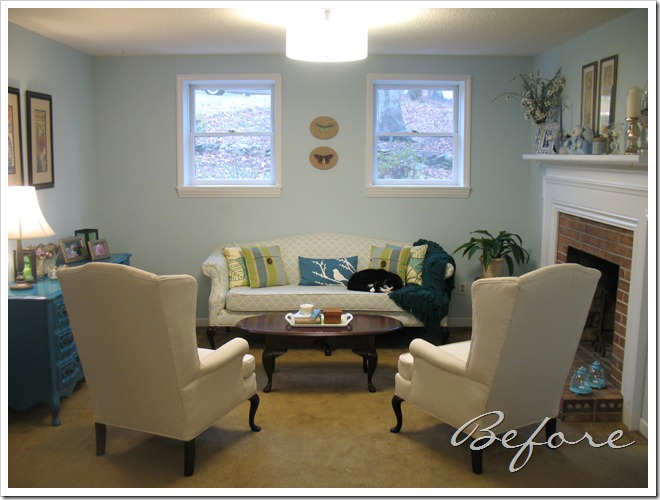
In addition to painting some furniture, we also painted some walls.  A lot of walls actually.  I finally got up the nerve to paint the kitchen and a few months later I did the foyer, hallway and living room, too.  It’s been a welcome change. 

IMG_7460

IMG_0438

The living room was a major project but we persevered and finished it, even the vaulted ceiling part!

IMG_8932

IMG_0895

We did some upgrades outside, too, completing the English garden pathways and also installing a 200-square foot paver patio in the backyard.

IMG_5126

IMG_0375

The paver patio was fun and challenging at the same time.  It was 100-degrees out and we were working under time constraints to get ready for a July 4th party.  But we managed to get it done!  It’s not perfect but it’s a major upgrade from the gravel mess that we were dealing with before.  I love our new patio!

IMG_2174

IMG_0671

and one more gratuitous patio shot. :)

IMG_0668

And our last big project of 2012 was of course new flooring for the den!  That was my birthday present and my brother-in-law installed the floors for me!  They are beautiful and so much nicer than the grungy carpet from before.

IMG_9412

IMG_1306

In addition to these notable projects, I also added more shelving to the garage, but I didn’t get it fully organized so I haven’t posted about that yet.  I also added shelving in the closet under the stairs which made it so much more functional.  I will be sure to share the details from these upgrades in the new year.  Meanwhile, let’s ponder a list of to-do goals for 2013!

  • Make curtains for den windows (probably going to inherit curtains from the living room)
  • Make new curtains for the living room to match the new couches!
  • Rebuild deck… (I enjoy putting this on the list every year)
  • Clear out “the last frontier” for sunny vegetable garden (or not?)
  • Finish exterior spruce-up with black shutters, black storm door, and freshly painted white trim! (Really have to do that this year… the front door is looking lonely without his shutter counterparts.)
  • Resow grass in back yard (again)
  • Resow grass in the front yard
  • Repaint/replace garden swing in English Garden
  • Reupholster Antique Chair for Office
  • Mount new TV on wall and rearrange gallery frames
  • Refinish dining table and side table in living room
  • Install overhead lights in the closets upstairs (are you reading this Papa??) :)

Not too many major projects on there except for the ones we likely won’t do.  :)  Bu I can’t wait to get started on the new year projects with a mini-makeover in the living room and a full reveal post! Stay tuned!

Happy New Year 2013!

signature