
Ever since we moved in to our house, I have dreamed of painting the kitchen cabinets. I was never a fan of the orangey oak look. There’s only one window and the wood cabinets make everything feel dark.

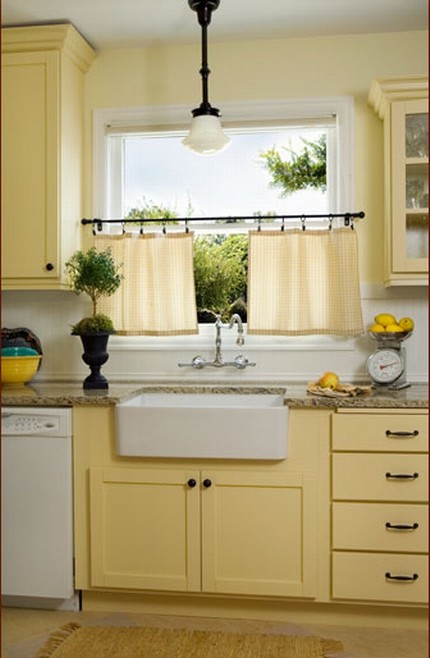
At first I wanted to paint them “butter yellow” and of course Michael looked at me like I was crazy (I get that look a lot) and then kindly told me that he didn’t like that idea very much. (Michael is always honest and usually he’s nice about it. :) hehe) So I put that idea on the back burner, because even though he didn’t like it, I still did! After a while I decided that maybe yellow wasn’t the best choice… I would probably get tired of it after a few years and then I’d have to paint the cabinets again!! Although, this one is very serene and classic, maybe for my someday country home:
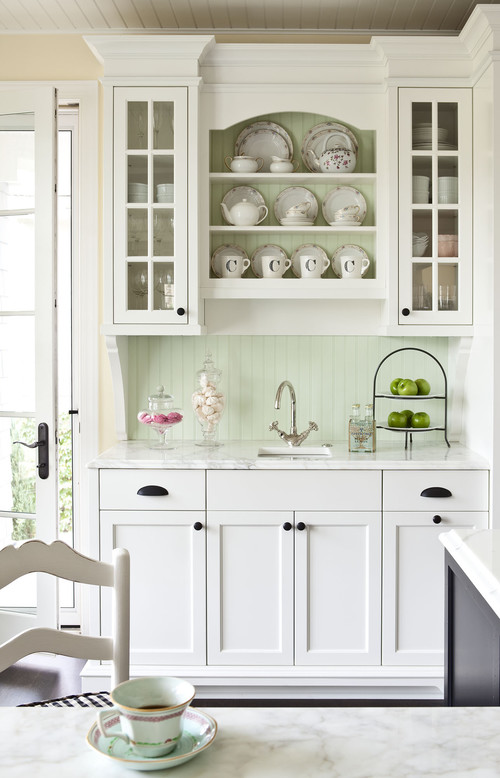
A few more months go by and I had talked myself out of painting the cabinets entirely… because if it ain’t broke, why fix it? But this past year I have been seeing lots and lots of white painted kitchen cabinets in blogland and Pinterestville. I love this one:
So, this time I suggested to Michael that I paint the cabinets white… and still he insisted that he liked them the way they were! Never one to be deterred, I hung on to my dream. And then in May, a friend of mine was over to help me bake a cake for the incomparable retirement party and we were discussing painting the cabinets. She was totally on board and encouraged me to do it! When Michael got home that evening, I mentioned that my friend thought we should definitely paint the cabinets… and a couple of days later he came to me and said that maybe the cabinets would be nice painted.
And I’m thinking: “What the what?!”
(scrambles for pen and paper)
“Can I get that in writing?!”
Husbands, I tell you. They just need time. ;)
So, here we are… cabinet painting time, at last! After much research I decided to use Benjamin Moore's Advance paint, which is a self-leveling alkyd that is water-based but acts like an oil. Like traditional oil paint, it dries to a smooth, hard finish that is very durable, but it is low odor and can be cleaned up with soap and water. After careful consideration I settled on “Simply White” which is white with a hint of creaminess. As for procedure, I basically followed the technique for cabinet painting over at Young House Love. Here is the timeline:
Day 1.
Make a shopping list and go to Lowe’s for supplies. :) Then go to fancy paint store for fancy paint only to find they don’t keep it in stock because no one buys this paint, (What?! No one from blogland shops here?) so they have to order it for you. Come home and clear kitchen. I am not painting the inside of the cabinets because 1) they are laminate, 2) I don’t have the patience and 3) who would really notice anyway? so I left all the food and dishes in the cabinets.
Remove all extraneous items from countertops. Remove all hardware from doors and drawers. Remove doors and drawer fronts. Make sure you label your doors and drawers in a way to help you remember where they go back. This will save you time when you are reinstalling them. I labeled mine on the back where the hinge plate will go. Lay out doors. I chose to do all my painting in the basement where I have a ping pong “work” table and I can shut the door to keep the cat out of my fresh paint. I ended up using three additional tables to fit all 19 doors and 9 drawer fronts. I used little foam blocks to elevate all the pieces. Begin cleaning doors with soapy water.

Day 2.
Go back to paint store and pick up special order paint. Clean cabinet frames with soapy water. Putty all holes and imperfections in frames (I bought identical new hinges so I’m reusing the old holes, so those were left alone.) Sand putty. Caulk seams between cabinets.
Here is where you insert a step that I skipped. I didn’t sand the frames or use deglosser on them before priming. Sanding dust would get all over everything in the kitchen including all my dishes, so I wanted to avoid that mess. And deglosser is full of stinky, dangerous chemicals and I didn’t want to stink up the upstairs to the point of us having to move out… so, I simply scrubbed the cabinet frames clean and then roughed up the sides with a sanding block. I am using Zinnser Bull’s Eye 1-2-3 water base primer which supposedly will adhere to glossy surfaces and even laminate without sanding or deglossing. I used this primer when I painted my vinyl backsplash and everything has held up just fine, so fingers crossed!
Tape off edges of walls, appliances and floor with painter’s tape. Since there are two open doorways into my kitchen and I have two furry beasts who like to get into trouble, I cleaned the kitchen top to bottom before painting and blocked the doorways with sheets tacked to the wall until all the wet paint was dry. I wasn’t risking cat hair in my kitchen cabinet paint!! And I certainly didn’t want to give Bandit a bath in the event that he rubbed up against a freshly painted corner. :)
Apply primer to cabinet frames and the baseboards of the cabinets. Let primer dry 24 hours. (The particular primer I’m using says to wait 2 hours for maximum stain sealing before painting, but I’ve read that you should wait a whole day for best results, so I opted to do that just to be on the safe side! Plus I was tired of painting anyway!)

Day 3.
Caulk baseboard seams (because I forgot to do those on Day 2). Prime under the upper cabinets. Finish cleaning doors with soapy water. Fill in any holes or imperfections in the doors. I am reusing the old hardware holes, so I left those alone. Sand doors with 150 grit sandpaper. (I only sanded the flat parts on the front and back since I was going to degloss them, too.) Wash doors again with soapy water to get rid of sanding dust. Clean the doors with liquid deglosser. Wear protective safety equipment! (I used the regular old-fashioned kind of deglosser because that’s what was available at my store, but I recommend you find the low VOC one, because this stuff is toxic and flammable and I do not like it! I was paranoid the entire time I was using it that it was going to spontaneously combust and I would be consumed by a fireball. Then who would finish the kitchen cabinets?!) Let deglosser dry.
Develop repetitive strain injury in arms from all that sanding/washing/paint brush holding. Develop back pain from leaning over doors and leaning sideways under cabinets. Take advil. :)
Get a second wind and prime the backs of the doors. (Start with the backs, so when you flip them over to do the fronts if anything gets scratched, it will be the back.) I brushed the edges with a 1 1/2” angled brush (I like Purdy brand) and rolled the flat planes with a 4” foam roller. Four doors in I realized that all my sharpie numbers on the back of the doors had been eaten off by the deglosser! So I had to stop and figure out where all the doors went and re-label them. This time I just wrote the number on the drop cloth (or table) in front of each piece. I’ll just be sure not to move them until they are ready to hang! :) Let your primer dry 24 hours.

Day 4.
Flip all the doors over and prime the front side.
Apply second coat of primer to the baseboards (they were black so it took two coats to cover) and cabinet frames just to be sure you cover all stains (especially important since I didn’t sand/degloss!) Let everything dry 24 hours.
Day 5.
Flip all the doors back over and apply the first coat of paint the back side. I was so excited and a little scared to start using my fancy, magic paint. I started brushing it on and it was just like… normal paint. What gives? I was expecting something to feel or look different. I did pay $60 a gallon for this paint… where are the sparkles? Where are the leaping unicorns? Is this just normal paint? Time will tell, I suppose. :)
Again I brushed the edges and the grooves in the molding and then rolled the flat planes. It took about two hours to paint the 19 doors and 9 drawer fronts. This is the part of the process where you hurry up and wait… The back of the can said the paint would dry to the touch in 2-4 hours and to recoat after 16. So, I honored the paint gods and let the doors dry until the next day.

Day 6.
Vacuum and dust the kitchen again and rehang the sheet “doors” to keep out the pets. Apply the first coat of paint on the cabinet frames and baseboards. I used a brush to cut in the edges and a 4” roller for everywhere else.
Apply a second coat of paint to the back of the doors.
(At this point, I was really getting bored and tired of painting… I was even dreaming of mopping the den… anything to get out of more door painting!! But I persevered and kept up my daily schedule. It takes about two hours to paint the frames and two hours to paint the doors, so it’s really only four hours of painting a day… and after the frames are done, you just have the doors left and that’s only two hours a day. YOU CAN DO IT! The sooner I’m done, the sooner the kitchen reveal—my favorite part!)
Let this coat dry 16 hours. After several hours the paint is dry to the touch and the finish is hard and smooth. Looking good! :)
Day 7.
Now, assuming you are happy with the coverage on the back side of your doors, you do not need another coat. Mine could have used a third coat, but since this is the back and no one will be studying them, I figured I could go ahead and call them done. Wait an additional 24 hours before flipping your doors over to the front. That way your paint has time to cure (a little) and hopefully doesn’t get scratched up while you are painting the fronts. I needed a day off anyway! :)
Day 8.
Vacuum and dust the kitchen again! Aaaargh… this is the problem with trying to paint cabinets in a kitchen that you are still using! Better safe than sorry, so clean up first! Apply a second coat of paint to the frames and baseboards.
Carefully flip all your doors over and settle on the foam blocks. Be gentle, that’s barely cured paint on the other side! I had a couple that stuck to the blocks and peeled a little of the primer off the front side. So I had to lightly sand and touch-up the primer before I painted those spots. Apply the first coat of paint to the front of your doors. You can really see the brushstrokes melting away as the paint levels out. It’s pretty cool! I found that the brushstrokes leveled faster than the roller marks, but it’s faster to roll the big areas than brush them, so I continued with my technique. Now let ‘em dry for 16 hours!

Day 9.
Examine the cabinet frames and decide if a third coat of paint is needed. I decided that two coats looked good, so I took all the painter’s tape off and put all my appliances and kitchen paraphernalia back on the countertops. Hooray—it’s a fully-functioning kitchen again! :)

The next step was to apply a second coat of paint to the fronts of your doors. When I went to begin, I noticed a lot of grain lines/stains? bleeding through my first coat! Aaaaargh!! I figured I could just keep slapping paint on top of it and hope it went away OR I could bite the bullet and put on another coat of primer. This development really annoyed/depressed/exasperated me and made me wish I had just left the stupid cabinets wood!!! But, I am a big girl, and I can handle setbacks with a lot of whining and some cookies grace. I decided to just do the primer again in hopes that it would seal whatever was seeping through and I could get back to my original timeline which was now a day behind. Grrr! This is why it is important to seal all the bleed-through with primer BEFORE you start painting. Preparation is ultimately the most important part of the process, Sarah!!! Anyone can slap a coat of paint on something… but if you skip the prep you will regret it! I did two coats of primer on the frames and I didn’t have any bleed through. So… after you begrudgingly go back and prime some more, wait the agonizing 24 hours for the primer to work its magic before painting.
Day 9.
Apply another first coat of paint to the door fronts. Here is a look at my excellent technique. :) After 8 days of washing my hands over and over to get all the paint off, I finally decided to wear gloves!


Fingers crossed that all the stains are sufficiently covered… wait 16 hours, again.
Day 10.
Everything looks good, no more stains bleeding through, so apply a second coat of paint to the door fronts. Hurry up and wait…
Day 11.
Examine your doors and decide if a third coat of paint is needed. I decided that two coats was enough, but I had a few touch ups where a stray cat hair had landed in the paint, and also a gnat decided to get stuck on one of the doors, too, so I just sanded them out with 320 sanding block and repainted. Ideally, you should lightly sand between every coat, but I didn’t bother because my cabinets are not in perfect shape to begin with. Who is going to notice all those tiny imperfections? NO ONE! :) I kept telling myself that it doesn’t have to be perfect, it just has to look good.
Day 12 - 17.
Benjamin Moore recommends you wait at least 3-5 days for your paint to cure before you restore your painted items into “heavy use” so I am waiting a whole week to rehang my doors. I am not taking any chances!! So now you just sit back and relax and wait…
I will be back in a week to reveal the final results of my kitchen makeover! In the meantime, here is your takeaway message for painting kitchen cabinets:
- Preparation is the most important step.
- Quality paint and primer are the second most important.
- Do not skip sanding/deglossing.
- When in doubt, re-prime. :)
- Be patient… painting your cabinets takes time. Expect to spend at least two weeks in disarray before your kitchen is restored.
- YOU CAN DO IT! Don’t let naysayers deter you; painting cabinets can be a DIY project!
See you next week for the big reveal!!

Update: Check out the reveal here!
2 comments:
I am totally exhausted from just reading this and greatly admire your ability to follow through...you go girl!!!
Thanks for sharing the work you did to kitchen cabinet.
Design A Kitchen Remodel
Country Kitchen Cabinets
Bathroom Remodel
Post a Comment