Showing posts with label Guest Room. Show all posts

Sunday, May 19, 2013

Spring Cleaning the Guest Room

I have been on a Spring-almost-Summer Cleaning kick lately.  So far I have cleaned the dining room and the guest room.  Hey don’t judge, progress is progress!  Anyway, I realized that it has been two years since I’ve featured my guest room on the blog, so here is a quick tour of the clean and refreshed space.

IMG_3041

IMG_3053

IMG_3065

IMG_3081

IMG_3062

IMG_3097

IMG_3072

IMG_3075

IMG_3077

IMG_3084

I rearranged the accessories on the wall shelf, some of which had been in the same spot since I started decorating this guest room!  So I added some white ceramic vases and turquoise frames to the mix.  I also exchanged the cedar nightstand for a tile top table.  It matches the pillow and accents in the room and its small scale fits the room nicely.  The pink flowers are from my knockout rose!  Love those!  And the new art on the dresser is by Katie Daisy.  Otherwise everything is still the same… for now! :) 

signature pink

P.S.  For a look back on all our guest room updates click here!

Friday, June 24, 2011

DIY Calendar Page Art

I recently acquired an expired (ooh, that rhymes!) calendar from a friend (Thanks Hannah A.!).  It was one of those fancy Cavallini & Co. calendars with an enormous, beautiful botanical print for every month of the year!  This one was Flora and Fauna 2010, which features compositions of antique bird, botanical, and butterfly prints, as well as 18th- and 19th-century ephemera (which is what all the French script and postmarks are about, I guess!).  Suffice to say, it was right down my alley decor-wise. 

  IMG_6236

So, after procuring the calendar, I got right down to business, selecting prints for my walls as well as some for my Mama, too.  We framed May’s pink flower and butterflies for her guest room and April’s cutie bird and branch for her master bathroom.  Then I took October’s fern frond and trimmed it to fit a thrift store frame.  Unfortunately for me, I was so excited to find a frame that was close to the right size, I neglected to notice that what I thought was a mat was only a white border on the cheap print within.  Sad.  So, this one is framed, but less fancily.  (Huh, fancily really is a word according to spell check?!)  I hung it in my sewing corner in the den.  The blue tones in the print coordinate perfectly with the wall color.  :)

IMG_6226

I think this one might get a 1” mat down the road.  Just for that symmetry that I love so much.  :) Lastly, I took January and November, both pastel butterfly prints, and framed them in a couple of 11x14 frames matted to 8x10.  The prints are originally about 9x13, but they just don’t make frames matted to that size.  Of course.  So, I had to select my favorite part of these prints to show within the 8x10 cutout.  Here is what I decided on after much deliberation:

IMG_6200

These frames are from Walmart’s Better Homes & Gardens collection.  They have a small bevel trim on the edge of the mat that matches the frame, which I love.  Yeah, BHG!  These are my new guest room art, which I hung over the bed to replace the DIY botanical prints I made last year, way back when the guest room was just a work in progress.  Here it is now, with the new prints on the wall:

IMG_6206

I love how the butterfly on the left has a shot of turquoise in him which ties in perfectly with the turquoise cushion and pillow in the room.  Hooray happy accidents! 

IMG_6209

So, five works of art later and I haven’t even used half of my calendar pages.  I still have February, March, June, July, August, September and December left.  If you see one remaining that you’d like to frame, let me know and I’ll send it to you!

IMG_6236 x

Now, I just have to decide where to put the old botanical prints that I’ve replaced.  Perhaps the laundry room could use some new art, since I’m always stealing things from in there.  Like those flowers on the bedside table.  hehe :)

signature

Saturday, September 25, 2010

Heralding the Headboard

Finally!  A headboard for the guest room!

Yes, friends, the day has finally come.  After many months of searching, sketching and planning, the upholstered headboard is finally finished!  You remember way back when, I asked you to vote for your favorite headboard, because the decision was making me crazy?  Well, the votes were almost unanimous, everyone loved the first option!  Which was this lovely creation:

image

Unfortunately, I didn’t stop to consider the ease of creating any of the designs in my poll.  And once you guys voted, well, how could I deny you the headboard of your choosing for our guest room?  You are my pool of potential guests after all! :)  So, Mama and I set out to make this fuzzy online inspiration photo (from Pottery Barn) a reality in true Guthrie fashion.  <—Guthrie being the other half of this Horvath’s life.  :)

Our first step was determining the right dimensions to compliment our full size guest bed.  We had a scrap piece of plywood left over from another headboard project that was just the right size, 58” wide (for a little overlap on the mattress), and at 48” high, no modifications were needed.  I drew off the corner curves and cut them with a jigsaw—my first experience using the jigsaw and I have to admit it was quite fun and easy, too! 

IMG_2814  IMG_2816

Then we cut four support braces for the back so the plywood wouldn’t flex too much.  These were simple 1x4’s cut to length and screwed on.

IMG_2818

Now we were ready for cushioning!  We cut a piece of 2” foam exactly the size of our board and glued it on using spray adhesive.  Then we added strips of 1” foam cut to size and glued them down to the back edges (so the foam edge would wrap completely around the frame) and the sides so they would be perfectly smooth.  We cushioned all the way down to a few inches below where the mattress would hit the headboard so there wouldn’t be a visible line where the foam stopped.  We also added four inch strips on the edges (or “posts”) where the edges would show around the mattress.  That way the whole “post” of the headboard would be upholstered as well.  We later had to pry some of that foam off the posts to put in a 2x4 bracket piece that the bolts would fasten to.  Otherwise the whole headboard would have been held together through 2” of foam, a layer of batting and 1/2” plywood.  Not good.  A little extra wood added at the fastening point made for a lot more stability in the finished product.  We measured on the bed frame where the brackets would match up and put our wood piece in there.  Then I drilled holes through the 2x4 and plywood backer, so it would be all ready for bolts later.

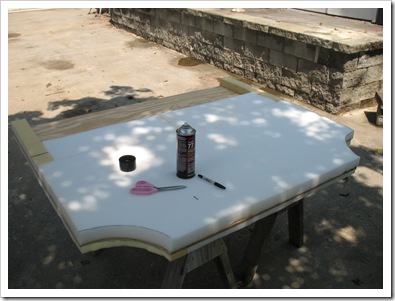
IMG_2822

IMG_2826 IMG_2827 IMG_2829

Here is the completely cushioned headboard ready for fabric!  Notice that we hadn’t added the 2x4 pieces on the posts yet.

IMG_2832

So, obviously, the third and final step was to cover the thing with fabric!  Artfully, of course.  Our design called for piping around a four-inch border.  First we planned the border pieces and the outer edge pieces.  They were piped and seamed together.  Then we measured for our center section and stitched it in. 
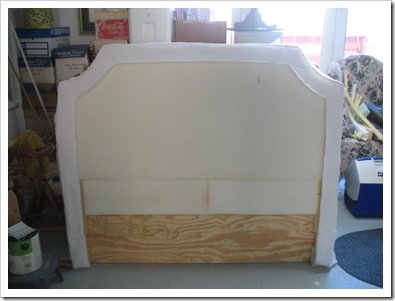
IMG_2863   IMG_2861

I’ll leave out the gory details, but this part was ridiculous!  A seemingly simple design turned into a frustrating ordeal.  Between the piping, the under layer of batting, shifty fabric (next time we are using real upholstery fabric that doesn’t have any stretch or give instead of soft chino), and the complexities of curves, angles, and corners, we were incredibly annoyed by the whole process.  I had long since given up on a successful completion but Mama would not be deterred.  After much fussing and re-cutting, she finally achieved the look we were going for.  And here it is in it’s new home:

IMG_2986

IMG_2988 IMG_2990   IMG_2991

Finito!

And just in time for our guests to arrive for Homecoming in a couple weeks.  I may have to try it out before they get here, it is so very soft and inviting.  The perfect place to kick back and read a good book.  With the window open and the glorious fall air rushing in.  Ahhhh…

Thanks for coming along on this guest room journey.  With the DIY light, upholstered headboard, and painting the closet off the list, I’m running out of things to do in here; guess I’ll just have to focus on another spot for a while. 

angel smiley

Come back soon for an update in the Den, as well as some fall decor! 

signature

Sunday, September 05, 2010

DIY Coffee Filter Light

What do you with 200 coffee filters, a paper lantern, and a glue gun.  Well aside from some sort of Project Runway challenge, you could make this awesome pom pom light! 

IMG_2903

I first saw this idea from Kara Paslay Designs and was instantly intrigued.  It reminded me of this capiz lotus flower light that I found here:

image

Awesome, right… yeah but who has $300 to shell out for a trendy light fixture… Not me.  So, when Kara Paslay finally released her secret to this awesome light—coffee filters, I was eager to try my own version.  Luckily coffee filters are super cheap.  Throw in a little (okay a lot) hot glue, a small paper lantern, and a corded light kit = Success!  All for under $20 bucks!  Mine cost me only $2 for coffee filters since I already had hot glue, and a paper lantern leftover from my sister’s wedding.

I started with a 12” lantern and used all my 200 coffee filters with 1/3 of the lantern left to cover.  That’s when I realized that my lantern was going to be huge.  12” base + 3” fluffy filters on both sides was coming out way too big for the space.  So, I begrudgingly ripped all the filters off the first lantern (thus rendering it shredded… and garbage… casualty of DIY gone wrong.)  After procuring a second smaller lantern (this one about 9”) I reglued all the puffs.  200 was almost perfect!  I have a few spots that need another puff or two, but I figured it was good enough to try it out!

Here it is, in its new home… our newly decorated guest room!  And luckily I found a way to disguise most of the cord behind the curtain!  The only problem I haven’t overcome yet is how to turn it on more easily.  The cord has a little switch on it, but unfortunately that part ended up behind the bed… annoying but not impossible... maybe I should get one of these.  By day, it looks like a cool pom pom hanging from the ceiling.  Very fluffy and textural.

IMG_2899    IMG_2900

It gives off a soft glow during the day…

IMG_2904

And really lights up the room at night…

IMG_2893

I love it!  Makes me want to lay on the guest bed and stare at the pretty fluffy texture all night.  :) 

What do you think?  I figure if I get tired of it in here or “some people” deem it too trendy, tacky, or strange, it will make an awesome night light for our someday nursery. :)

Hope you all are enjoying this holiday weekend… I’ll be back with more updates in here as soon as our upholstered headboard is finished!

signature

Thursday, June 17, 2010

Guest Room Progress and a Poll

So, at long last, I have finally completed the linens in the guest room.  The pillow I showed you Bandit presented was just icing on the cake for the foundation pieces that are finally done. 

Here is the before:

IMG_2328

And After:

IMG_2383

Very subtle, right?  Just swapped out the bedskirt and pillows and added a teal throw.

IMG_2382

I finally replaced the bedsheet covering the boxspring with a proper bedskirt!  I bought the fabric many months ago and this week I decided to tackle the project.  At last, it’s done! Take a look at those awesome box pleated corners… you know, the ones that will never be seen because of the enormous duvet covering them?  Yeah those.

IMG_2386  IMG_2387

I also tossed on a couple of matching pillows.  The lovely ivory velvet ones we had in here before get to go back to the master bedroom where they will adorn the bed lay in a pile in the corner. :)  Here’s the crisp, new shams with their happy friend, Mr. Punchy pillow.  You’ve already met him.

IMG_2384  IMG_2385

So, that brings us to the end of the linens in the guest bedroom.  We can now update the checklist:

  • Paint
  • Bedding
  • Artwork
  • Seat cushion for cedar chest
  • Accent pillows
  • Bedskirt
  • Upholstered Headboard

That leaves us with one remaining project!  The Headboard!  We have the supplies and white fabric all ready to go, now anyone want to come decide on a style for me?  I just can’t choose between them!  Here are the contenders:

1. Square with curved corners

white headboard

2. Curved with square cutouts

betterhomesandgardensupholsteredheadboard_thumb

3. Lots of curly cutouts… Mama would hate me for this one!

elizabethdinkeldesigns_thumb

4. Simple curve

white curve headboard

5. Tall curve with big square corners, tufted

decorpadupholsteredupagainstwindow_thumb

6. Square, tufted

guest room 6

7. Curve, tufted

urban_tufted_headboard-718444

The sky is the limit for headboard shapes, but I’m cutting myself off at seven choices!  So, cast your vote… which is your favorite?

signature