Wednesday, December 07, 2011

A Silver and Gold Christmas Mantel

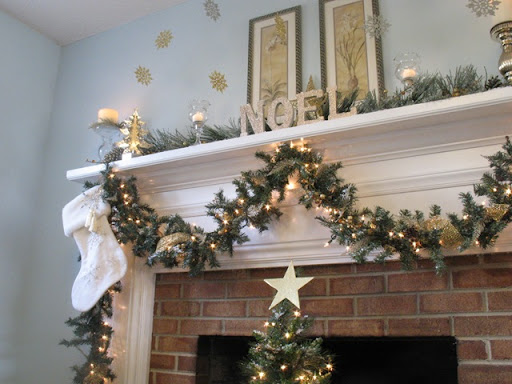
Our next stop on the Christmas tour is the den.  The focal point in this room is the fireplace.  Our Christmas mantel returned to the silver and gold theme of last year but with a couple of tweaks.

IMG_8591

I left the floral prints above the mantel since the gold tones tied into the color scheme.  Then I layered the mantel with a frosted pine garland, glittered pinecones, gold sprigs and candles.  My beautiful faux mercury glass pillar holders are joined by a couple of candlesticks topped with fluted votive cups.  I bought these for our wedding table and never used them.  When I unearthed them at my parent’s house, I decided to use them on the mantel.  They are so cute!

IMG_8590

Under the mantel I draped a fir garland twined with gold ribbon and beads and silvery gold sprigs.  Twinkling lights add to the sparkle.  And over the whole scene, gold and silver snowflakes are fluttering from the ceiling.  To complete the hearth, I put my little tree in the center and topped it with a gold star.  And the stockings are hung on either end, ready for Santa!
IMG_8596

After everything was set and the NOEL letters secured to the mantel (the garland kept knocking them over) I sprinkled everything with a bit of sparkling snow!  The garland and tree have a snowy look and you can see the dusting of snow on the mantel ledge.  I love it!

IMG_8603

IMG_8605 

Over on the couch, the ivory velvet pillows from the bedroom join a couple of striped pillows.  And in the center is a new green felt pillow that I copied from BHG.  It’s the perfect complement to all the snowflakes on the mantel.

IMG_8594

I have recently fallen in love with this antique toolbox and I keep bringing it out as a centerpiece.  I stuffed it with fir trimmings, cedar sprigs and glittering pinecones.  My mercury glass votives fill in the tray and everything is dusted with snow!  A couple of tiny white glitter trees flank the centerpiece. 

IMG_8595

Another greenery filled basket joins a collection of wintry items on the cabinet.  A couple of snowmen, a pair of gold tapers, and a reindeer bring the spirit of the season to this side of the den. 

IMG_8598

And here is the view that will greet Santa on Christmas Eve… 

IMG_8607

Hope he doesn’t knock over the little tree when he comes down the chimney! :)

happy ho ho holidayssignature

For more mantel inspiration… check these out:

image

Tuesday, December 06, 2011

Christmas Candy Kitchen

Today our holiday tour brings us into the kitchen where I’m creating a wonderland of bright colors and candy stripes!  Last year I showed you my colorful Christmas kitchen.  Well, since then I have added an array of colorful ornaments, tinsel and a candy themed table.  Come along and I’ll show you the sweet stuff…

IMG_8461

Tinsel along the cabinets is paired with colorful glowing lights.  Over the sink, a medley of colorful glittery ornaments are suspended from the ceiling.  Beneath, a cedar wreath and my “wish” sign adorn the window. 

IMG_8472

Snowflakes flutter over the cabinets on the other side of the kitchen.  The snowflakes are double-sided with color on one side, but it seems they were all rebelling and decided to turn white-side out.  Hmmph…

IMG_8474

Now for the piece de resistance… my sweet Christmas table!! 

IMG_8452

It’s lacking the pretty red table runner (since it really lives in the dining room) so I guess I’ll have to make another one!  Once again, the peppermint dishes from Pier 1 are combined with a cupcake candle from Kohl’s.  I added a couple of vintage Santa mugs because I saw them at Pottery Barn and realized my Mama had very similar ones from the 80’s!!  I just noticed that PB’s version has winking and blinking Santas.  Color me jealous.

IMG_8453

The cupcake candles actually smell like cupcakes…  You can imagine what that is doing for my self control. :)

IMG_8454

For the centerpiece I found these peppermint stripe candles last year and thought they would be perfect!  I elevated the display on a cake stand.  The green placemat is from Michael’s.  I see these die cut placemats everywhere and I love them!

IMG_8455

My dedication to the Christmas Candy theme lead me to pick up this cutie ribbon candy tree at Big Lots the other day.  It’s made from claydough (not PlayDough, right Abby?) which I think is retail speak for “incredibly fragile and likely to break within the first year”.  It is the perfect complement to my candy and sweets theme… and it was totally worth $10, right Hannah?

IMG_8537

The supporting cast on the shelf is a vintage teddy bear bank and caroling kittens.  Have I mentioned lately that I love my tiny kitchen shelf?  The only thing that could make it better is if it were bigger.  :) :)

Pier 1 has a candy wreath that I must have to go on the opposite wall.  Either that, or I’m gonna DIY something like this evergreen one.

image           image

Pier 1                                                                       Other guys  

In the corner over the table, I hung my giant ornaments formerly of the dining room doorway.  Michael complained that they were hitting him in the head.  Oh well, at least it gave me an opportunity to try them in a new spot…

IMG_8469

The kitchen is especially festive at night with just the colorful lights and everything glows pink! :)

IMG_8569  IMG_8568

Thanks for coming along on the Christmas tour… come back soon to see our silver and gold holiday mantel!

image

signature

Sunday, December 04, 2011

Christmas Tablescape in Red and Gold

The Christmas Tour continues in the dining room!     

IMG_8486

The dining room got its traditional Christmas treatment with swirly gold and red placemats and runner.  Each place is set with red metallic chargers and Lenox Holiday china. 

IMG_8488

IMG_8489

I took the silver platter from my autumn centerpiece and filled it with real trimmings from my tree, cedar sprigs, glittery sprays and my beloved glitter poinsettias.  Every year it’s a delight to discover those flowers in the Christmas boxes, followed closely by the excitement of finding a special place to display them.  (They always end up in the dining room... hehe) 

IMG_8491

I love my holiday china and table linens.  This year I put the red napkin on the outside and the swirly one on the inside for more contrast.  While looking over my past Christmas photos, I decided that I have been doing it wrong for the past two years.  Yes, I sit and think about this stuff… it’s serious business. :)

IMG_8490 IMG_8498

The chandelier got its Christmas spruce (get it, spruce? hehe) with greenery, pinecones, glitter sprigs and gold snowflakes. 

IMG_8495

Over in the corner on the cherry cabinet I put the cute little china bowl of Christmas goodness.  I pulled it out of the box just like this!  It was hiding out in the master suite last year, but I thought it deserved some face time in the main house. :)

IMG_8482

And I draped a red scarf over the chair to cozy up the corner a bit more.  Several years ago, I fell in love with this scarf from Victoria’s Secret and bought a clearance sweater just so I could get the scarf “free with sweater purchase”.  That is love, I tell you.  I have since worn the sweater and scarf each once.  The chair has worn it several times, though.  :)  The scarf, not the sweater… although that would be interesting.

IMG_8481

And in the other corner, my Christmas birdcage perches on the flatware cabinet.  This year I filled my birdcage with greenery and a real nest!  I found the nest in the driveway this summer and I’ve been saving it for my tiny golden bird. :)  I think she likes it.

 IMG_8477

To finish the room, I brought out a couple of wreaths for the deck doors.  I added some real tree trimmings and a beautiful red and gold bow.  I love them so much that I made a similar one for the front door.  Stay tuned for that!

IMG_8497

merry christmas

signature

The Lettered Cottage

Friday, December 02, 2011

Wonderful Christmas Time

Can you believe it is already December 2nd and I haven’t posted one thing about Christmas yet!?!  I know, it’s unbelievable.  Well, I am here to rectify this situation with the big reveal of my Christmas tree!  I haven’t visited the blog much lately, but I’ve been busy working my magic behind the scenes on Christmas decorations and crafts. 

I actually started decorating for Christmas before Thanksgiving this year (eek!) but we had to wait until after Turkey Day to get our tree or else the Thanksgiving sanctity police (AKA Michael) were gonna put me away. :)  Anyway, the tree is up and here it is:

IMG_8418

It is hard to think of new creative things to do with the tree each year that don’t involve buying all new decorations and lights… so I decided to once again switch up the ribbon on the tree.  Last year I used gold mesh ribbon and the year before I had red beads.  I like the red ribbon so much more!  I got a new tree stand and to accommodate it I had to cut off a lot more branches from the bottom of my tree.  Good for wreaths, bad for tree.  I’m still filling in the space beneath with presents.  By Christmas Eve I’ll be glad for the extra room!

There’s something else new under the tree this year, a little red sleigh:

IMG_8422

Papa has been busy building sleighs this year and here is mine!  It’s holding a few gifts, as well, and taking up some more of the too-much space under the tree. :) 

The tree is the star of the show, but here’s the rest of the room:

IMG_8446

I put my cranberry trees in the mercury glass pots that I got for Christmas last year.  They are tres fancy.

IMG_8428

And my couch is sporting a couple of new pillows, too!  I made them for my sister, but before they were delivered, I “borrowed” them for my blog photos.  Sneaky, huh?

IMG_8406

I love them.  I want to steal them.  Barring that, I’ll have to settle for making a set of my own.  They are green and cream felt.  I printed the template for the snowflake one from BHG.  (They have a bunch of good holiday ideas with felt!)  You can’t really tell from this picture, but I sewed all the way around the snowflakes instead of gluing them on.  It was annoying, and took forever.  But, it’s pretty! :)

IMG_8409

For this one, I borrowed an idea from Pottery Barn and applied it to a pillow.  I love it especially.  I’m thinking I’ll have to whip up something for my den couch, too. :)

IMG_8411

I brought back the plaid topper and Santa over on the console cabinet and spruced it up with some greenery and pinecones.  I would have added lights, but 1) I have no lights left and 2) the outlet is behind the cabinet, so I would never plug them in.  Just imagine there are lights. :)

IMG_8433

To finish off the space, I hung my garland on the railing and added shiny ornaments and bows.  Let’s just ignore the fact that I hit my head on this all the time while coming up the stairs and trying not to trip on the puppy/kitty. 

IMG_8437

Here’s the view from the foyer:

I’m sure you’re wondering how I hit my head on this… well, trust me, anything is possible if you try hard enough. :) 

IMG_8439

It’s all so much prettier after dark…

IMG_8565

Come on over one night and I’ll fix us a cup of hot cocoa and we’ll sit and stare at the tree.  :)  Ahhh, Christmas…

IMG_8561

happy christmassignature